
This post may contain affiliate links. As an Amazon Associate, we earn from qualifying purchases. We only recommend products we trust.
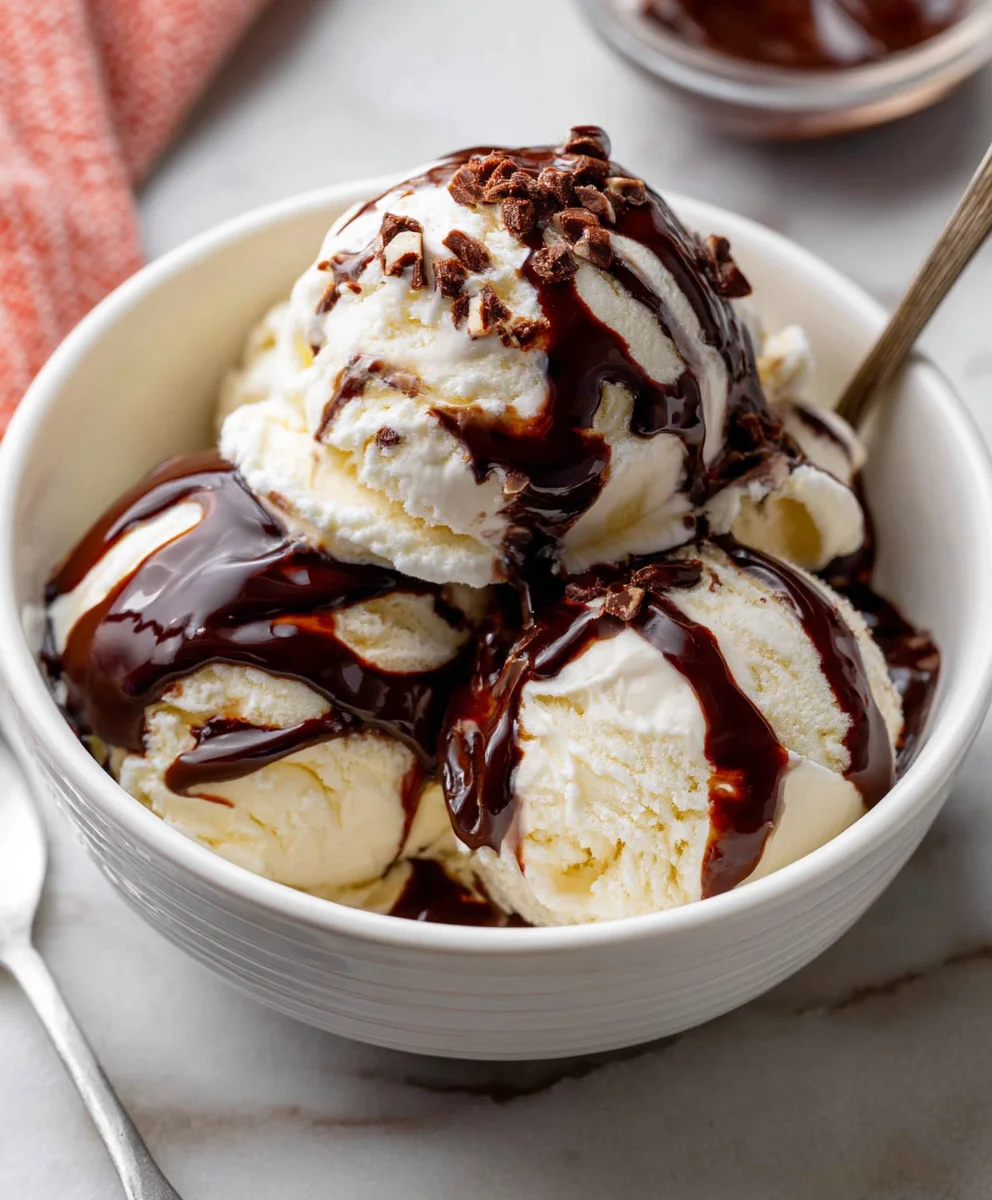
Imagine scooping into a bowl of homemade ice cream, so rich and creamy it melts in your mouth. This isn’t just any ice cream recipe; it’s The BEST Ice Cream Recipe, incredibly easy to make and endlessly customizable. Perfect for hot summer days or a comforting treat any time of year, this recipe brings the joy of artisanal ice cream right to your kitchen. Crafted with simple ingredients and a touch of love, it’s a delightful way to celebrate sweet moments. Let’s dive into the world of homemade ice cream!
Why You’ll Love This Ice Cream Recipe
This easy ice cream recipe will become your new favorite. Here’s why:
- Ready in under 30 minutes!
- Silky smooth texture that rivals store-bought brands.
- Requires only a handful of basic ingredients.
- Completely customizable with your favorite flavors.
- No ice cream maker needed (but works great with one!).
- A guaranteed crowd-pleaser for parties and gatherings.
- Effortless enough for even novice cooks to master.
The aroma of vanilla fills your kitchen as this irresistible dessert churns. Prepare for a taste sensation!
Ingredients Needed for Homemade Ice Cream
Here’s what you’ll need to create this creamy masterpiece. Quality ingredients make all the difference!
- 2 cups (480ml) Heavy Cream: Use at least 36% milk fat for the richest texture.
- 1 cup (240ml) Whole Milk: Balances the richness of the cream.
- ¾ cup (150g) Granulated Sugar: Adds sweetness and helps prevent ice crystals.
- 1 tablespoon Vanilla Extract: Enhances the flavor; use pure extract for best results.
- Pinch of Sea Salt: Balances the sweetness and brings out the other flavors.
Selection Tips: For the best vanilla extract, look for a dark amber color and a strong aroma. Fresh, cold dairy is key for optimal ice cream texture.
Flavor Boost: Consider adding a splash of bourbon essence (non alcoholic) for a unique twist, enhancing depth and complexity!
Check out: Carrot Cake Oatmeal Bake – A healthy twist for cake lovers!
Essential Equipment List
Having the right tools makes all the difference in creating perfect ice cream. Here’s what you’ll need.
- Mixing Bowls: For combining ingredients.
- Whisk: To blend ingredients smoothly.
- Saucepan: For heating the mixture (if using a cooked base).
- Ice Cream Maker (Optional): For churning the ice cream.
- Freezer-Safe Container: For storing the finished ice cream.
Alternatives: Don’t have an ice cream maker? Use the “no-churn” method (instructions below!). A heavy saucepan ensures even heating and prevents scorching.

Recipe Details
- Prep Time: 10 minutes
- Cook Time: 5 minutes (if making a cooked base)
- Churn Time: 20-25 minutes (in ice cream maker)
- Total Time: 35-40 minutes (plus freezing time)
- Servings: 4-6
- Difficulty: Easy
Scale up the ingredients proportionally for a larger batch; divide the recipe for individual servings!
Step-by-Step Instructions
Follow these simple steps to create the best ice cream you’ve ever tasted!
Step 1: Prepare the Base
In a mixing bowl, whisk together the heavy cream, whole milk, granulated sugar, vanilla extract, and sea salt until the sugar is fully dissolved. For a richer flavor, consider gently heating the cream and sugar in a saucepan over medium heat until the sugar dissolves completely; then, let it cool.
Step 2: Churn the Ice Cream
If using an ice cream maker, pour the mixture into the machine and churn according to the manufacturer’s instructions (usually 20-25 minutes). The mixture should thicken to a soft-serve consistency. Don’t have an ice cream maker? Pour the mixture into a freezer-safe container and freeze for 3-4 hours, stirring every 30 minutes to break up ice crystals. This method requires a bit more effort but yields surprisingly creamy results.
Step 3: Freeze and Enjoy
Transfer the churned ice cream to a freezer-safe container and freeze for at least 2 hours to allow it to firm up. Before serving, let the ice cream sit at room temperature for 5-10 minutes to soften slightly. This makes it easier to scoop and enhances the creamy texture. Serve and enjoy your homemade masterpiece!
YOU MIGHT LOVE: Apple Cinnamon Oatmeal Bake – a delicious breakfast!
Tips for Success
Here are some expert tips to ensure your ice cream turns out perfectly every time:
- Use high-quality ingredients for the best flavor.
- Chill the ice cream maker bowl completely before churning.
- Don’t over-churn the ice cream, or it may become grainy.
- If the base is too sweet, add a squeeze of lemon juice to balance the flavor.
- For intense flavor, steep vanilla bean in the cream overnight.
Beginners: Pre-measure all ingredients to streamline the process. Save time with pre-made vanilla extract rather than creating your own!
Variations & Substitutions
Customize this recipe to suit your taste and dietary needs. Here are a few ideas:
- Chocolate Ice Cream: Add ½ cup of cocoa powder to the base.
- Strawberry Ice Cream: Fold in 1 cup of diced strawberries after churning.
- Dairy-Free Ice Cream: Use coconut cream instead of heavy cream.
- Sugar-Free Ice Cream: Substitute with your favorite sugar substitute, adjusting to taste.
Add a pinch of cinnamon for a warm and inviting flavor boost!
Serving Suggestions & Pairings with Ice Cream
Elevate your ice cream experience with these delightful pairings:

- Warm Brownies: The classic combination.
- Fresh Berries: Strawberries, blueberries, or raspberries.
- Chocolate Sauce: A decadent addition.
- Crumbled Cookies: Adds texture and flavor.
Pair with a refreshing lemonade to cut through the richness of the ice cream. This dessert is a summer barbecue stunner!
Health Benefits
While ice cream is a treat, it can offer some nutritional benefits. Dairy provides calcium, essential for bone health, and protein, which supports muscle growth and repair. The vanilla extract adds antioxidants, promoting overall wellness. Remember, moderation is key to enjoying treats as part of a balanced diet.
Storage & Reheating
Proper storage ensures your ice cream stays fresh and delicious. Store the ice cream in a freezer-safe container with an airtight lid. To prevent freezer burn, press a piece of plastic wrap directly onto the surface of the ice cream before sealing. Homemade ice cream is best enjoyed within 2 weeks. There’s no need to reheat ice cream; simply let it sit at room temperature for a few minutes to soften before serving.
Frequently Asked Questions
How Do I Avoid Ice Crystals?
Ice crystals form when the ice cream melts and refreezes. Prevent this by churning the ice cream well and storing it in an airtight container. Adding a bit of corn syrup can also help.
Can I Use a Different Type of Milk?
Yes, but the fat content will affect the texture. Whole milk is recommended, but you can use 2% or skim milk for a less rich version.
How Long Does Homemade Ice Cream Last?
Homemade ice cream is best enjoyed within 2 weeks, as it doesn’t contain the stabilizers found in store-bought versions.
What If My Ice Cream Is Too Hard?
Let it sit at room temperature for 10-15 minutes before scooping. Running your ice cream scoop under warm water can also help.
Nutritional Information
- Serving Size: 1/2 cup
- Calories: Approximately 250
- Fat: 18g
- Carbs: 20g
- Protein: 3g
Exact stats need a nutrition calculator for accuracy.
More Delicious Dishes to Explore: Sweet Treat Edition
Craving more delightful sweets? Explore these tasty treats!
- Delectable Maple Apple Crisp – A warm and comforting dessert.
- Mint Chip Brownies – A refreshing twist on a classic.
- Easy Maple Pecan Shortbread Cookies – Buttery and irresistible.

Conclusion
This homemade ice cream recipe is fast, flavorful, and guaranteed to impress. Whip it up tonight and tag us with your creamy creations! Share this recipe with your friends and family who would love it! Join our vibrant community on Facebook and Pinterest for daily recipe inspiration, cooking tips, and more tasty ideas!
Happy cooking!
The BEST Ice Cream Recipe
- Total Time: 35-40 minutes (plus freezing time)
- Yield: 4–6 servings 1x
- Diet: Vegetarian
Description
Indulge in the creamiest homemade ice cream. Easy to make and endlessly customizable!
Ingredients
- 2 cups (480ml) Heavy Cream
- 1 cup (240ml) Whole Milk
- ¾ cup (150g) Granulated Sugar
- 1 tablespoon Vanilla Extract
- Pinch of Sea Salt
Instructions
- Whisk together heavy cream, whole milk, sugar, vanilla, and salt.
- Churn in an ice cream maker or freeze and stir every 30 minutes.
- Freeze for at least 2 hours before serving.
Notes
- Storage: Store in an airtight container for up to 2 weeks.
- Flavor Variations: Add cocoa powder for chocolate, or diced strawberries after churning.
- Prep Time: 10 minutes
- Cook Time: 5 minutes (if making a cooked base)
- Category: Dessert
- Method: Churning/Freezing
- Cuisine: American
Nutrition
- Serving Size: 1/2 cup
- Calories: 250
- Sugar: 20g
- Sodium: 50mg
- Fat: 18g
- Saturated Fat: 12g
- Unsaturated Fat: 5g
- Trans Fat: 0g
- Carbohydrates: 20g
- Fiber: 0g
- Protein: 3g
- Cholesterol: 70mg
Keywords: ice cream recipe, homemade ice cream, easy ice cream, dessert recipe, no churn ice cream